1971 VW Type 3 Fastback
-
Aaronslimvw

- Posts: 180
- Joined: 10th August 2018 - 7:49pm
Re: 1971 VW Type 3 Fastback
Great work mate keep it up
Re: 1971 VW Type 3 Fastback
Kit yes, skills, not really. Very much learning on the job it'll good enough to look smart as it drives past, but closer than a few ft and you'll see imperfections!jake@facewest.co.uk wrote: ↑14th October 2018 - 4:05pmGreat stuff, nearly there!
Painting is really full of ups and downs! Not sure I could face repainting mine. Might see how much a decent respray is in the spring. But looks like you've got the kit and skills, and are nearly there. Well done.
Certainly trying, now the weathers cooler off its hard to motivate myself to go and wet sand haha.
Right time for a few glory photos. Ive been flatting away, starting with 1000, I did use 800 in a couple of small rough areas. But largely its been 1000. 1800. 2400. 3200 using micromesh. First attack was the roof.
It looks reasonable in that photo, the reflection is well enough. But then turn and catch it in the sun.
This was disappointing, but it seems to have been down to my lack of skill with the MOP. I have since done some research and brushed up on my technique. Hopefully I can correct that tomorrow. I returned to the sanding, wishing to get as much done in the mild weather last weekend. I had the hose pipe with a constant dribble of water running.
Again I had the swirling issue as this was before id done the reading.
but the shine was half decent,
After flatting, but before polishing.
And after G3 followed by G10
I will take some photos with a much better camera tomorrow and try to pick out the imperfections, but if any people who have the know how see anything im doing which is obviously know, please tell me before i cock the rest of the job up
The sultan of swing
Re: 1971 VW Type 3 Fastback
Nothing really to report, ive understood a lot more about the paint and have got this finish now.


The sultan of swing
-
937carrera

- Posts: 1190
- Joined: 7th June 2013 - 11:54pm
- Location: North Yorkshire
Re: 1971 VW Type 3 Fastback
Nothing much to report eh
Are you going to share the knowledge on the paint as the finish looks good to me
David
1974 412LS Variant
1973 412LE 4 door Fastback / Saloon
1974 412LS Variant
1973 412LE 4 door Fastback / Saloon
-
jake@facewest.co.uk
- Posts: 59
- Joined: 23rd May 2018 - 10:54pm
Re: 1971 VW Type 3 Fastback
Looking good.
What type of paint are you using? 2 Pack or cellulose?
Cheers
Jake
What type of paint are you using? 2 Pack or cellulose?
Cheers
Jake
Re: 1971 VW Type 3 Fastback
After some research ive discovered that not all abrasive paper grades are the same 1500 is all the same, silicon carbide is more aggressive that aluminium oxide, so a 2000 SC is more like at 1500 AO. So Ive been flatting with far to coarse paper. Ive also been baking with an infra red heater for an hour or so before I start flatting937carrera wrote: ↑4th November 2018 - 9:06pmNothing much to report eh
Are you going to share the knowledge on the paint as the finish looks good to me
jake@facewest.co.uk wrote: ↑4th November 2018 - 9:07pmLooking good.
What type of paint are you using? 2 Pack or cellulose?
Cheers
Jake
Thank you, its celly, I wanted the more classic look
The sultan of swing
Re: 1971 VW Type 3 Fastback
Well as good as that rear panel looks, the rest of it is causing some bother. Still being left with scratches and swirl marks in enough places to upset me.
I flatted the boot lid right back once again. I expect its my last chance before I get through to primer!

Then after some time gently massaging it was G3 and then G10


The reflection is more than good enough for what I wanted to achieve, but take a look on the left there around the house roof, and then to the right near the tree.
Bit of a spoiler that! But as id not got it that good before Ive left it alone and decided to work on the bonnet so I can get that refitted. Im acutely aware the longer the panels sit in the garage the higher the chance ill scratch/dent/chip one.
So the same as above, 1200/1500/2000 on blocks, spray bottle of water and a bucket of water. A hose pipe for washing off. I flatted it right back to dull and seemingly smooth, unfortunately the light was fading by this point, but none the less i polished it with G3 and it again looked half decent.

But once id taken it in the garage it really didn't look half as smart, id seemingly made it worse!

At this point I was feeling rather demoralized, it was time to stop adding brush strokes and know when to stop.
The paints had 4-6 weeks to cure nice and warm for the first two weeks, and averaging around 8 for the remaining. I will chalk this up to experience and assume the paint simply is still too soft at the minute, I have started to bake one panel at a time in front of my IR heater. I am going to leave the colour sanding for, well probably until next year. Giving the paint as much time as it needs to settle.
Wanting to recover some garage space and reduce the likely hood of bumping into a painted panel ive decided the gearbox and engine need to go home.
This meant the first job was to install the wiring loom and then any of the other bits and bobs which sit on the underside of the boot floor.
To quote Kirsty Wark "More on that story later"
I flatted the boot lid right back once again. I expect its my last chance before I get through to primer!
Then after some time gently massaging it was G3 and then G10
The reflection is more than good enough for what I wanted to achieve, but take a look on the left there around the house roof, and then to the right near the tree.
Bit of a spoiler that! But as id not got it that good before Ive left it alone and decided to work on the bonnet so I can get that refitted. Im acutely aware the longer the panels sit in the garage the higher the chance ill scratch/dent/chip one.
So the same as above, 1200/1500/2000 on blocks, spray bottle of water and a bucket of water. A hose pipe for washing off. I flatted it right back to dull and seemingly smooth, unfortunately the light was fading by this point, but none the less i polished it with G3 and it again looked half decent.
But once id taken it in the garage it really didn't look half as smart, id seemingly made it worse!
At this point I was feeling rather demoralized, it was time to stop adding brush strokes and know when to stop.
The paints had 4-6 weeks to cure nice and warm for the first two weeks, and averaging around 8 for the remaining. I will chalk this up to experience and assume the paint simply is still too soft at the minute, I have started to bake one panel at a time in front of my IR heater. I am going to leave the colour sanding for, well probably until next year. Giving the paint as much time as it needs to settle.
Wanting to recover some garage space and reduce the likely hood of bumping into a painted panel ive decided the gearbox and engine need to go home.
This meant the first job was to install the wiring loom and then any of the other bits and bobs which sit on the underside of the boot floor.
To quote Kirsty Wark "More on that story later"
The sultan of swing
-
937carrera
- Posts: 1190
- Joined: 7th June 2013 - 11:54pm
- Location: North Yorkshire
Re: 1971 VW Type 3 Fastback
I'm really disappointed for you.
Is this just simply down to the fact that you haven't used an oven ?
You could do with finding something like a boiler room that you could "store" them in for a while
Is this just simply down to the fact that you haven't used an oven ?
You could do with finding something like a boiler room that you could "store" them in for a while
David
1974 412LS Variant
1973 412LE 4 door Fastback / Saloon
1974 412LS Variant
1973 412LE 4 door Fastback / Saloon
Re: 1971 VW Type 3 Fastback
It seems to be the lack of oven, the panels are baking nicely with the IR heater now, Im not too frustrated, its nice to move back to more mechanical jobs and theres nothing to stop me colour sanding it when it warms up next year. My local powder coaters just got a nice new oven which I might see if I can blag some time in, see if they will bake a door for me and see if it helps.
The sultan of swing
Re: 1971 VW Type 3 Fastback
Shall we have a change of pace then, I know I need one.
I dragged the rats nest out of the loft.

It has all sort of splices and joins along with horrible modern connectors. I wanted all this nonsense removed, I have planed to simple cut trim and solder it all healthy.

Back in august danny lord put a box of wiring loom up for sale. It was a bit of an unknown with out getting my hands on it, I couldn't and just had to go on the photos. I thought I might get something useful and it was about £20 from memory. Once id unpacked it all I worked out it as for an injection engine late type 3. A good starting point, the wires seem supple and nothing looks heat/fire damaged. The section which runs from the fuse box to the regulator and then all the way to the engine bay and rear lights was all there and in unfettled condition.

The only fault I found was the diagnostic socket, its clip on cover had broken off. My original loom has this.


Before I got any more involved I sat and worked out if both looms had the same number of wires in the right places with the right colours.

With it confirmed that new and old were all but the same, I removed the socket from my old loom and cleaned it, the carefully marked out this pin diagram to make sure when I fitted this socket to my new loom it was wired up correctly. Ignoring the fact it will almost certainly never get used

I dragged the rats nest out of the loft.
It has all sort of splices and joins along with horrible modern connectors. I wanted all this nonsense removed, I have planed to simple cut trim and solder it all healthy.
Back in august danny lord put a box of wiring loom up for sale. It was a bit of an unknown with out getting my hands on it, I couldn't and just had to go on the photos. I thought I might get something useful and it was about £20 from memory. Once id unpacked it all I worked out it as for an injection engine late type 3. A good starting point, the wires seem supple and nothing looks heat/fire damaged. The section which runs from the fuse box to the regulator and then all the way to the engine bay and rear lights was all there and in unfettled condition.
The only fault I found was the diagnostic socket, its clip on cover had broken off. My original loom has this.
Before I got any more involved I sat and worked out if both looms had the same number of wires in the right places with the right colours.
With it confirmed that new and old were all but the same, I removed the socket from my old loom and cleaned it, the carefully marked out this pin diagram to make sure when I fitted this socket to my new loom it was wired up correctly. Ignoring the fact it will almost certainly never get used
The sultan of swing
-
937carrera
- Posts: 1190
- Joined: 7th June 2013 - 11:54pm
- Location: North Yorkshire
Re: 1971 VW Type 3 Fastback
Good attention to detail Broady.
Did anybody ever actively use the diagnostic socket
Did anybody ever actively use the diagnostic socket
David
1974 412LS Variant
1973 412LE 4 door Fastback / Saloon
1974 412LS Variant
1973 412LE 4 door Fastback / Saloon
Re: 1971 VW Type 3 Fastback
Pointless attention to detail is what got me where I am today!937carrera wrote: ↑11th November 2018 - 12:23pmGood attention to detail Broady.
Did anybody ever actively use the diagnostic socket
I hope someone did, I expect VW did at a few product launches at the very least
The sultan of swing
Re: 1971 VW Type 3 Fastback
I visited an old VW dealership in the middle of Wales this week, they had a diagnostic machine at the back of the workshop.
The chap there said it hadn't been used for 30 years, and looking at the layer of dust on it he was probably right.
The chap there said it hadn't been used for 30 years, and looking at the layer of dust on it he was probably right.
Re: 1971 VW Type 3 Fastback
Do you happen to have a contact number? Would they be willing to part with it?
The sultan of swing
Re: 1971 VW Type 3 Fastback
Unfortunately not, I was on the way home from a job when I passed and asked to look around.
The chap there was pretty reluctant to let me in, and was adamant nothing was for sale, and I couldn't take any pics.
The chap there was pretty reluctant to let me in, and was adamant nothing was for sale, and I couldn't take any pics.
-
937carrera
- Posts: 1190
- Joined: 7th June 2013 - 11:54pm
- Location: North Yorkshire
Re: 1971 VW Type 3 Fastback
You might have had a better response if you were in the squareback - probably thought you were casing the joint shame. PM Broady with the garage details ?
David
1974 412LS Variant
1973 412LE 4 door Fastback / Saloon
1974 412LS Variant
1973 412LE 4 door Fastback / Saloon
Re: 1971 VW Type 3 Fastback
Thats as good as an excuse for me not to spend money, if he doesnt want to sell it, it will make it hard work to get it for a fiver 
The sultan of swing
Re: 1971 VW Type 3 Fastback
It would probably just sit there gathering dust anyway. I'm sure they worked with punched cards, after 30 odd years I can't imagine them being in tip-top condition.
Re: 1971 VW Type 3 Fastback
I thought I had some pics somewhere.
It's quite a large device.
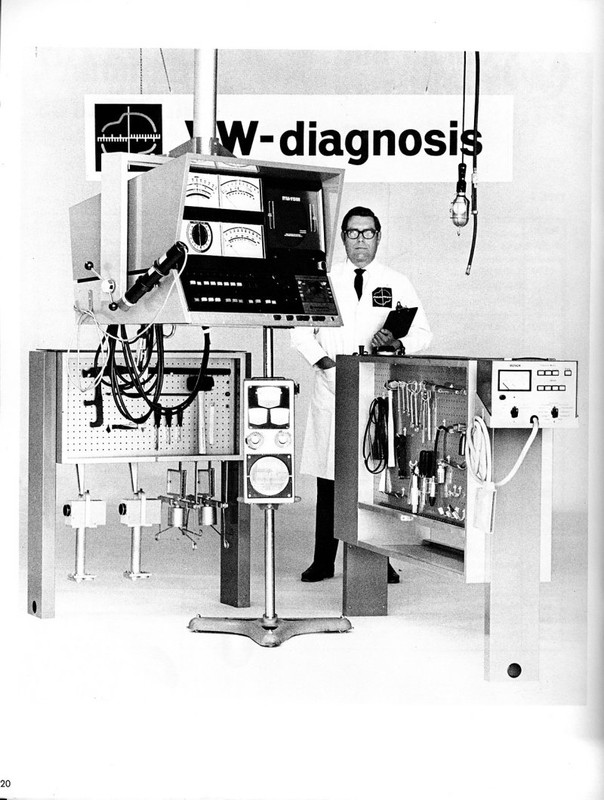
And here's a printout.
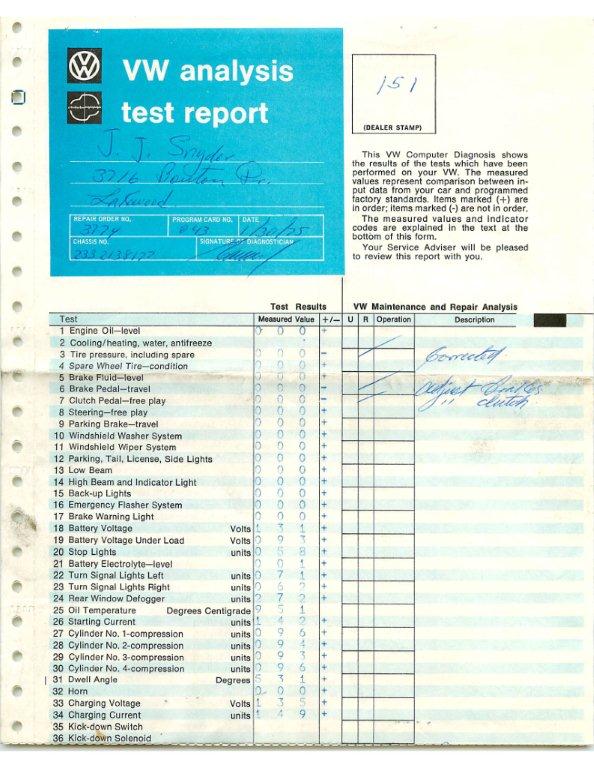
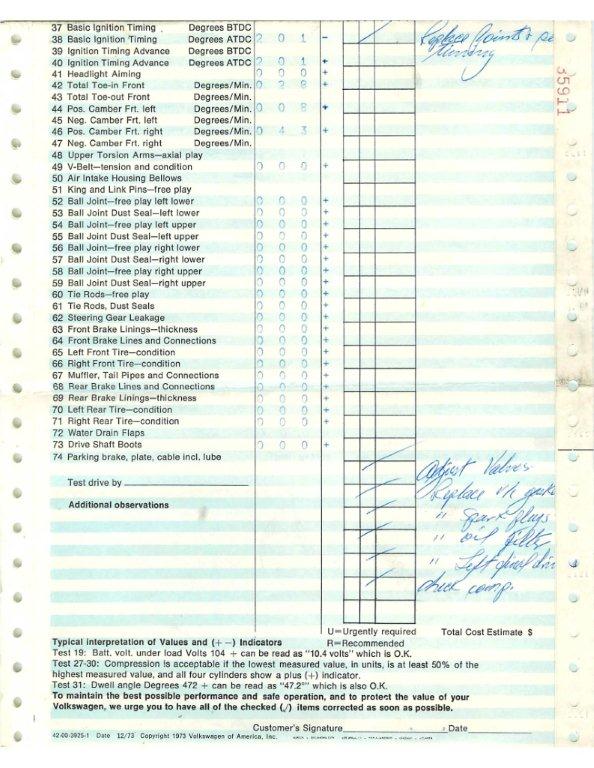
Just like a "SUN" diagnostic machine I suppose.
It's quite a large device.
And here's a printout.
Just like a "SUN" diagnostic machine I suppose.
Re: 1971 VW Type 3 Fastback
Yeah, so I don't need this haha! Its a flash bit of a kit though. Still wouldn't mind getting my hands on a plug one day
The sultan of swing
Re: 1971 VW Type 3 Fastback
Such is my way, lets jump about between jobs.
Dug out the rubber grommets to feed the loom through the engine bay and through under the rear seat. I cleaned them up installed them and fed the loom through. Following this I was going to complete the routing in the bay. It was at this point it was brought to my attention that I had missed a couple of repairs, some of the small tabs which retain the wiring loom had broken off and needed welding back on. With these three fellas reattached I also noticed I had someone managed to miss a great lump of painting. So i cleaned the area up on the inner back panel and painted that body colour.
Yet another job I was reminded of before the loom could be installed was the requirement to de waxoyl the rear wing air intakes and the rear panel air box. I spent a couple of hours with a scraper and petrol soaked rags to removed it. Then I filled the rear panel cavity with dinatrol cavity wax and inside the side airboxes with a black harder waxier dinatrol. Its not had a few days of curing so tomorrow I should get the chance to feed some wires through!
In other news, remember all that work I did on the rain deflector under the scuttle panel? Well what I didnt tell you was that although it was a good fit and sealed up, when I installed the wiper mechanism, the motor mounting tab was about 10mm to far south west. I had considered removing hte bracket and welding it in to the right place. But In the end I had pulled this panel back out for some adjustment later on.
While I was avoiding doing this job, this came up on ebay. at £35 I was left with no option but to hit Buy It Now


The leading edge was shot, but as this was the bit which needed reworking on the old panel, it was something id have to make anyway.
I hot footed down to the blasters and prayed id still have something to show for my £35. Pleasingly only 1 hole appeared and its not to bad to repair.


Sticking with the spirit of this, I havent done any more with that, but I got my spare set of stock wheels blasted and powder coated so that ive got some wheels to fit to the car while I work out what im going to do with my sprint stars.

And there you go, you thought you were going to read more about my wiring loom, oh how wrong you were!
Dug out the rubber grommets to feed the loom through the engine bay and through under the rear seat. I cleaned them up installed them and fed the loom through. Following this I was going to complete the routing in the bay. It was at this point it was brought to my attention that I had missed a couple of repairs, some of the small tabs which retain the wiring loom had broken off and needed welding back on. With these three fellas reattached I also noticed I had someone managed to miss a great lump of painting. So i cleaned the area up on the inner back panel and painted that body colour.
Yet another job I was reminded of before the loom could be installed was the requirement to de waxoyl the rear wing air intakes and the rear panel air box. I spent a couple of hours with a scraper and petrol soaked rags to removed it. Then I filled the rear panel cavity with dinatrol cavity wax and inside the side airboxes with a black harder waxier dinatrol. Its not had a few days of curing so tomorrow I should get the chance to feed some wires through!
In other news, remember all that work I did on the rain deflector under the scuttle panel? Well what I didnt tell you was that although it was a good fit and sealed up, when I installed the wiper mechanism, the motor mounting tab was about 10mm to far south west. I had considered removing hte bracket and welding it in to the right place. But In the end I had pulled this panel back out for some adjustment later on.
While I was avoiding doing this job, this came up on ebay. at £35 I was left with no option but to hit Buy It Now
The leading edge was shot, but as this was the bit which needed reworking on the old panel, it was something id have to make anyway.
I hot footed down to the blasters and prayed id still have something to show for my £35. Pleasingly only 1 hole appeared and its not to bad to repair.
Sticking with the spirit of this, I havent done any more with that, but I got my spare set of stock wheels blasted and powder coated so that ive got some wheels to fit to the car while I work out what im going to do with my sprint stars.
And there you go, you thought you were going to read more about my wiring loom, oh how wrong you were!
The sultan of swing
-
937carrera
- Posts: 1190
- Joined: 7th June 2013 - 11:54pm
- Location: North Yorkshire
Re: 1971 VW Type 3 Fastback
Well it makes a change from your doll hairs
Spellcheck no doubt
Spellcheck no doubt
David
1974 412LS Variant
1973 412LE 4 door Fastback / Saloon
1974 412LS Variant
1973 412LE 4 door Fastback / Saloon
Re: 1971 VW Type 3 Fastback
Is that not what the mericans use a currency?937carrera wrote: ↑16th November 2018 - 10:39pmWell it makes a change from your doll hairs
Spellcheck no doubt
https://www.youtube.com/watch?v=UEkv9oIQw4A
The sultan of swing
Re: 1971 VW Type 3 Fastback
I’m not one for paint, my mate who is told me I should use washing up liquid in the bucket when flatting off. I’m unsure but a mop would help and then a DA sander for the a reel nice finish. Did I mention I’m not one for paint?!?
Re: 1971 VW Type 3 Fastback
I don't think it's washing up liquid as it contains salt, but a couple of drops of liquid detergent are sometimes used in the flatting water to stop the paper dragging as you sand.