Well its winter again so might get on with this!!
To say Ive had my thumb up my arse on this would be an understatement, my whole arm would prob still be on the shy side but time seems to no longer be as freely available since the little fella arrived ,anyway, "moving forward" as they say when you dont want to talk about what might, or might not have been happening before now,,,,
Seriously, we had our first child late feb so that has taken over most free time recently, all going great & bit more settled now so able to get things moving again,
Im going with having lugs welded onto the side of the case for the full flow conversion, just think it makes a better job of it & the welding is almost cheaper than the pump cover & fittings anyway!
Been given a scrap case to hack the required lugs off to make sure the alloy is the same.

Also got the bulk of the parts together,


Dual Empi 34's

And,,, probably my favourite, part since I chose these myself (although decided on them with advice) arrived today,
DRD Racings L3 heads, hand lapped multi angle 35.5 X32mm stainless steel valves, Hi Chrome Valve Seats, Silicone Bronze Valve Guides, single hi rev Valve Springs, Chromoly Keepers & Retainers, 16% increase flow, 14mm x 3/4" plug ports, 55cc chambers, 90.5mm bore.

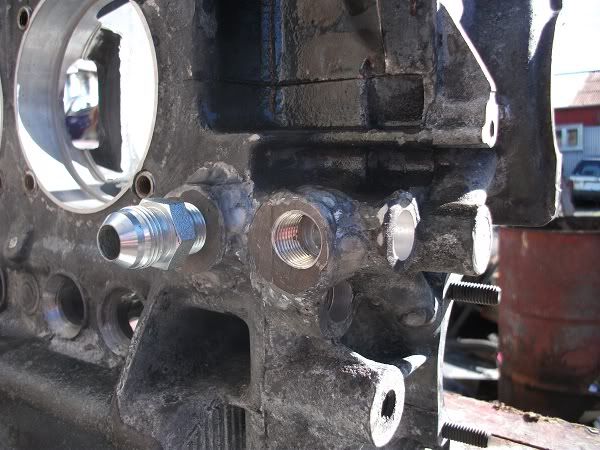
Also Ive got the galley plugs all tapped (other than the 2x 3/8" plugs where I will be getting the side flow ports welded on as that will prob effect the bore so will do those afterwards).
I managed to get one of the 1/8" plugs stuck in the scrap case where I did my test, tightened it a little to much & now the socket is starting to strip, there are more of those than I need anyway, didnt test the ones on my case any where near as tight after that!!
Took it easy with both drilling & tapping, drill a bit, stop clean & check, drill a bit more etc & only tapped 1/4 turn each cut & came out to clean & check every 2 full turns at most, used CRC for both.
Couldn't get the 1/8" plug in the side all the way in as the drill walked a little & created a shoulder in the bottom of the hole, I think once its tight it will be pretty much up to the last full thread though.

Brought a cheap tap set that had a full thread 1/8NPT tap in it & I found that running this down after the interrupted tap removed a considerable amount of metal, and allowed the plugs to sink a bit further in with out going any deeper.
Ive left the 1/8" plug on bore that flows to the oil pressure relief valve a few threads proud as I didn't see the point in drilling all the way through into this bore so I have a left a 2.1mm shoulder, if the fly wheel is to close I will grind the top off the plug.

Also the 2 cam follower locations are slightly proud, (one of them seen at the bottom of the pic) again leaving a shoulder in the port rather than drilling right through to the bore which the follower runs in.
Found with the 1/4" plug between the oil cooler & dizzy that if I sink this flush it will start to block the galley that flows horizontally to this vertical port, its still a good 3/4 in with out tightening so will seal fine.

And I have tapped the dizzy one so that it will be 1-2 threads proud to prevent thinning the wall of the dizzy bore.
Finally, sorted out the No4 plug prob, read earlier posts for details about this, no drama, just drilled right in & sunk a 1/8" plug down past the main bearing oil feed, this plug will be drilled out to 2.4mm (need to double check that size on the samba) to duplicate the original restriction plug. Then drilled & tapped the first part of the bore for a 1/4" plug, which I need to get as I don't have enough.

And finally, Ive measured up the journals on my crank, will be getting the Mshop to check & polish it anyway but thought Id make sure Im not in for any nasty news,,,
Ive not removed my timing gear but heres the rest:
Main bearing journals:
1 (fly wheel) = 54.98<985mm
2 = 54.96<97mm
Con Rod journals :
No3 piston = 54.98<99mm
No4 piston = 54.98mm
No1 piston = 54.97<98mm
No2 piston = 54.97<98mm
This is with the shaft at 18'c and a 50<57mm (0.01mm) mic, zero checked with a 50mm calibration block.
Looks ok, I think(!), did start checking across 3 points but in the end went around pretty much the entire shaft.