
Overhaul of Fuel Injection Fuel Pump
Electric Fuel Pump - Basic Operation
Pump is mounted below fuel tank and gravity fills pump rotor chamber expelling air via a small groove in the pressure relief valve ( PRV ) piston, priming pump, see Figure - 1.
Figure - 1
With pump running the quantity and pressure is such that the PRV piston opens and fuel is delivered to the system, see Figure - 2. The actual pressure being controlled by the engine mounted pressure control valve.
Figure - 2

Should a total blockage occur somewhere in the fuel system, the PRV piston is pushed back farther and fuel is returned to the tank,
Figure - 3.

Electric Fuel Pump - Servicing
1 ) Pump will not run
- Dismantling pump head Before commencing to dismantle pump head, locate and note the position of the indentation mark in the centre rotor plate, which is to one side of the electrical connection. This plate can be reassembled in 8 different ways and the pump will only work with it in the correct orientation, see white mark in picture.

2 ) Pump runs but will not pump - Blocked air vent
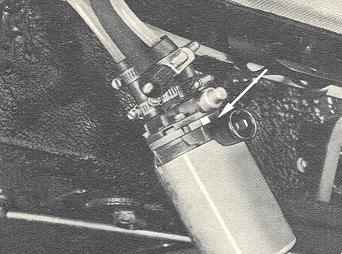
The most likely reason for a pump to run but not pump is that the very small groove in the PRV piston is blocked and causing an airlock. This will especially be the case for an old pump that has not run for sometime (and let's face it, most are already 30 to 35 or more years old). The pump must have fuel in the rotor chamber as it cannot pump just air. The piston is chromed, running in a chromed cylinder, so it is unlikely to have rusted, but it is more likely to have jammed due to the lacquer that forms from petrol over time. My personal solution to the problem is to very carefully prise back the piston against the spring with a suitable sized screwdriver as shown below and break the lacquer bond, fill behind the piston with penetrating fluid and then connect an electric tyre inflator directly to the return nozzle. As the pressure increases it pushes the piston back, and after 2 or 3 goes it should clear the vent if you are lucky. The piston has a rubber tip which can very easily be damaged, and also any burr caused by the action of the screwdriver against the alloy pump head must be removed. The pump head is a Teflon coated alloy so it is probably best to cut away any burr with a sharp knife rather than relap the whole face. Removing the whole piston and spring assembly should only be considered as the very last resort; the aluminium caps are easier to prise off than the steel caps, but after thirty years or more the aluminium can be so corroded that they almost disintegrate. Alternatively before dismantling the PRV try using a spray-can of Carb Cleaner where the nozzle is usually fitted with a very fine tube, which can be inserted down inside the return nozzle, and blast out any gunge that may have built up behind the piston.

Jim Adney in the USA recommends storing spare pumps and also fuel injectors in suitable containers immersed in paraffin. This should stop O-rings etc., from drying out and things going rusty, which sounds a very good idea, especially in the case of the piston and vent groove in the fuel pump pressure relieve valve.
3 ) Motor case leak - Removing motor case
Using various sizes of screwdrivers prise up the 5 positions where the edge of the motor case is clenched over around the pump head, you will need strong wrists and some patience. With the pump head carefully held in a vice, use a blunt or soft drift to drive off the casing working around the 5 positions in turn. Once the case has started to move it can usually be pulled off by hand using very slight up and down and side to side movements (remembering that the motor shaft end bearing is built into the casing). As the casing is removed, take care not to lose the thrust washers from the end of the internal shaft; these will most likely to drawn to the magnets that are fixed to the inside of the case. With the case removed dress the 5 areas that were clenched over as smooth as possible taking care not to damage the O-ring sealing area inside of the casing. Then clean this sealing area and the O-ring groove. I finally polish these areas with paint rubbing-down cream. Using a new lightly oiled or greased O-ring and with the thrust washers replaced on the motor shaft slide on the case ( just to be sure I apply a very light smear of non-setting sealer to the area in front of the O-ring taking extra care not to contaminate the O- ring and its groove). There is only one way that the casing can be refitted due to the cut-out for the electrical connection block. Finally lightly tap the casing hard up against the shoulder of the pump head, and then working around the case re-clench casing.

4 ) Replacement O-ring Details
Metric sizes ----Warning:- Take all necessary care and precautions when test running pump as flammable liquids and electricity do not go well together, and eyes should be protected when carrying out any pressure testing.
George Tunks 2005
VW Type 3 & 4 Club; 1997 - 2019